Blog
Screen Door Gasket: A Complete Guide for 2026

You open the patio door for evening air, hear the familiar slide and click, and think everything is sealed. Ten minutes later, a mosquito is circling the kitchen light. The screen looks fine. The mesh isn't torn. So where did it get in?
A lot of homeowners blame the screen itself when the issue lies around the edge. The screen door gasket is the soft seal that closes the tiny gap between the door and the frame. When that seal gets brittle, shrinks, or stops compressing, bugs, dust, and hot air can slip through the perimeter even though the door appears shut.
That matters in any climate, but it matters even more in the Phoenix area. Strong sun, heat cycling, and daily use wear out flexible gasket materials faster than many people expect. A door can still slide or swing normally while the seal has already failed.
Introduction to Screen Door Gaskets
A bad gasket is typically noticed indirectly. The first clue might be bugs indoors at dusk. It might be extra dust near the door track. It might be that hot, dry outside air seems to leak in around the edge even when the screen door is closed.
The confusing part is that a screen door has more than one “seal.” Homeowners often lump together the bottom sweep, the mesh spline, and the perimeter weatherstrip. They're different parts. The screen door gasket in this guide means the perimeter seal that presses against the frame to close side and top gaps, and sometimes part of the bottom edge depending on the door design.
If you're not sure which style of door you have, this overview of common screen door types helps you identify whether you're dealing with a sliding patio screen, a hinged screen door, or another setup with different sealing details.
Why this small part matters
A gasket does a simple job, but it affects several comfort problems at once:
- Bug control: It closes the bypass route around the screen mesh.
- Dust reduction: It helps stop windblown debris from sneaking through edge gaps.
- Comfort: It improves the seal against drafts and outside air movement.
- Door performance: It can reduce rattling and make the door feel more snug.
Think of the mesh as the fence and the gasket as the gate latch. If the fence is perfect but the gate won't close all the way, pests still get through.
A screen door can look healthy from across the room and still fail at the perimeter.
Why Phoenix homeowners should pay extra attention
In mild climates, homeowners can often treat gasket wear as routine maintenance. In high-UV areas, neglect gets expensive in slower, less obvious ways. You may clean more often because of dust intrusion. You may chase a bug problem that isn't coming from the mesh at all. You may replace rollers or adjust the latch when the bigger issue is that the seal has lost its shape.
That's why it helps to understand how a gasket works, what materials hold up best, how to measure correctly, and when replacement is smarter than patching.
Understanding Gasket Functionality
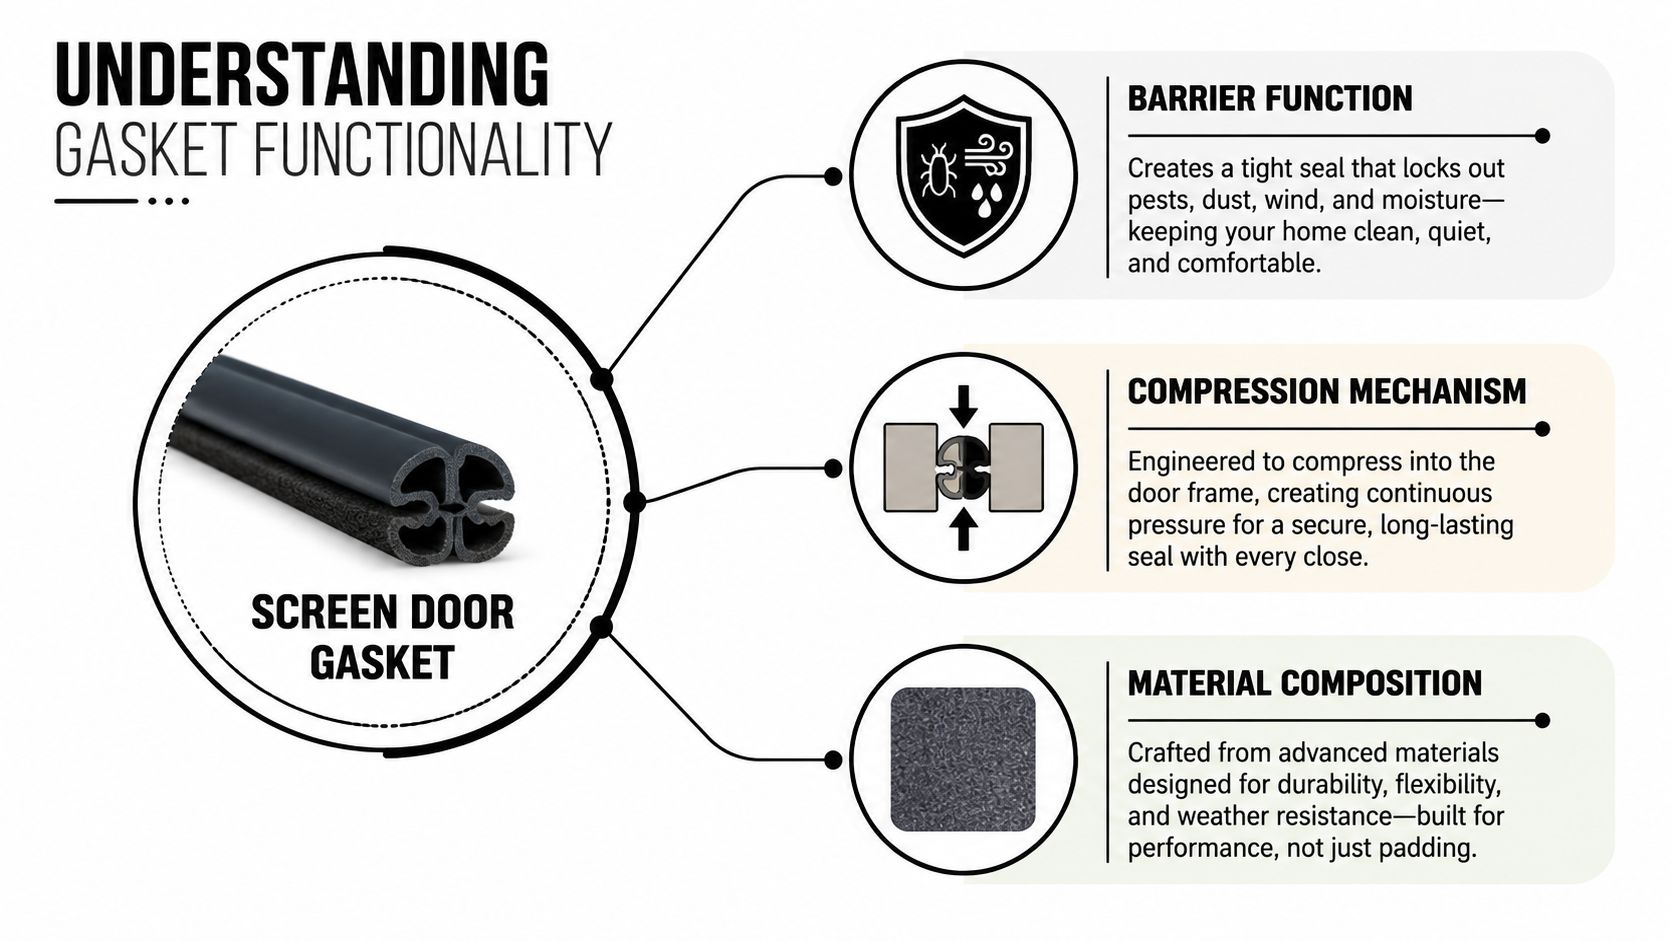
A screen door gasket is more than a strip of foam. It's a working seal that depends on shape, material, and pressure.
When the door closes, the gasket presses into the frame and fills the gap. That contact is what blocks air, dust, moisture, and insects from slipping around the edges. If the seal barely touches the frame, you get leaks. If it's crushed too tightly, the material can lose its spring and stop rebounding.
The barrier around the screen
The mesh blocks what comes through the center of the door. The gasket blocks what tries to go around it.
That's not a minor detail. Screen doors with properly installed gaskets and weatherstripping can reduce the number of house-entering mosquitoes by 59% to 77% compared to control houses without such barriers, according to a mosquito exclusion study published by PMC. That finding is a good reminder that edge sealing is functional, not cosmetic.
Why compression matters
A useful analogy is a handshake. Too loose, and there are gaps. Too hard, and one side gets strained. A gasket needs the same balance.
The seal works by compression. The material has to press enough to fill irregularities in the frame, but not so much that it stays flattened. When homeowners buy the wrong profile or size, they often create one of two problems:
- Under-compression: The gasket touches in some places but leaves hidden openings in corners or along bowed frame sections.
- Over-compression: The bulb or foam gets crushed, drags on the frame, and wears out faster.
Practical rule: A gasket should compress like a cushion, not like cardboard.
Why wear happens faster than people expect
A perimeter gasket lives a rough life. It gets squeezed every time the door closes. It heats up in direct sun. It cools at night. It gets hit by dust, moisture, and repeated friction. That combination is why seal failure often shows up before the rest of the door has aged out.
Daily use adds mechanical stress. A stationary window seal just sits there. A screen door seal gets flexed and rubbed over and over. In Phoenix, the sun adds another layer of punishment because UV exposure makes some materials dry out, shrink, or crack sooner.
What homeowners often miss
Many people look for visible damage in the mesh first. That makes sense, but edge failure is easier to overlook because the gasket may still be attached while no longer sealing correctly.
Watch for these subtle clues:
- Light at the edge: Stand inside at dusk and look for a thin line of daylight around the frame.
- Uneven contact: One section feels snug while another section feels loose.
- Dust trails: Fine dirt collects near one side of the door or in the corner.
- Bug pattern: Insects show up even though the mesh is intact.
A gasket's job is simple, but its success depends on getting the pressure and fit right.
Comparing Gasket Materials and Types
Material choice changes how long the gasket stays flexible, how it handles heat, and how well it resists sun damage. That's why two seals that look similar on the shelf can perform very differently on the same door.
According to this weatherstrip material guide, screen door weatherstrips are commonly made from EPDM rubber, PVC, silicone, or neoprene to block dust, insects, wind, and moisture while also improving thermal insulation and acoustic performance.
What the main materials do best
Here's the quick version. EPDM is often a strong choice for exterior use because it handles weather and UV exposure well. Silicone stands out when a door gets intense solar exposure and high heat. PVC is common and practical, but it may not age as gracefully in harsh sun. Neoprene can be useful where flexibility and general durability matter.
| Material | UV Resistance | Temperature Stability | Average Lifespan | Cost |
|---|---|---|---|---|
| EPDM | Strong | Good for exterior conditions | Varies by exposure and use | Moderate |
| PVC | Moderate | Moderate | Varies by exposure and use | Lower |
| Silicone | Strong | High | Varies by exposure and use | Higher |
| Neoprene | Good | Good | Varies by exposure and use | Moderate |
The table stays qualitative on lifespan and cost because exact figures depend on the door design, sun exposure, and product profile.
Material choice in a Phoenix climate
For a shaded patio in a milder region, several material types may work fine. In the Phoenix area, heat and sunlight narrow the field. Homeowners usually care about one question above all others: which material keeps its shape longest when the frame gets hot every afternoon?
That's where EPDM and silicone usually deserve the closest look. EPDM is widely used for outdoor sealing because it handles weathering well. Silicone can be a smart fit where the door gets prolonged direct sun and high surface temperatures.
Types that people confuse
Homeowners often use one term for three different parts. That creates bad purchases and frustrating repairs.
Here's the simplest way to separate them:
- Perimeter gasket or weatherstrip: Runs along the sides and top, sometimes part of the bottom edge depending on the system. This is the seal that closes the gap between the door and frame.
- Bottom sweep: A separate flap or strip that helps close the lower gap.
- Spline: The cord that locks the mesh into the frame groove. It isn't the perimeter seal.
Profile matters too
Material is only half the decision. Profile shape matters just as much.
A few common profiles include:
- Bulb seals: Rounded, compressible shapes that fill uneven gaps well.
- Foam strips: Easy to install, but often less durable in punishing sun.
- Flat rubber profiles: Useful where the frame leaves a narrower, more uniform sealing surface.
If your door has uneven spacing from top to bottom, a bulb-style gasket usually handles those variations better than a simple flat strip. If the frame is straight and the gap is consistent, a simpler profile may work fine.
Choosing a gasket is a fit problem first and a material problem second. Both have to be right.
Measuring and Selecting the Right Screen Door Gasket
Bad gasket replacements usually fail for a simple reason. The homeowner guessed the gap instead of measuring it.
A screen door frame rarely has the exact same spacing all the way around. Corners can be tighter. The latch side may sit differently than the hinge or roller side. Seasonal expansion can also change how the door meets the frame. That's why measuring once at the middle and buying a strip by eye often leads to drag, leaks, or both.
For a fuller walk-through on door dimensions before ordering parts, this guide on how to measure for a screen door is a useful starting point.
Measure the actual gap, not the old gasket
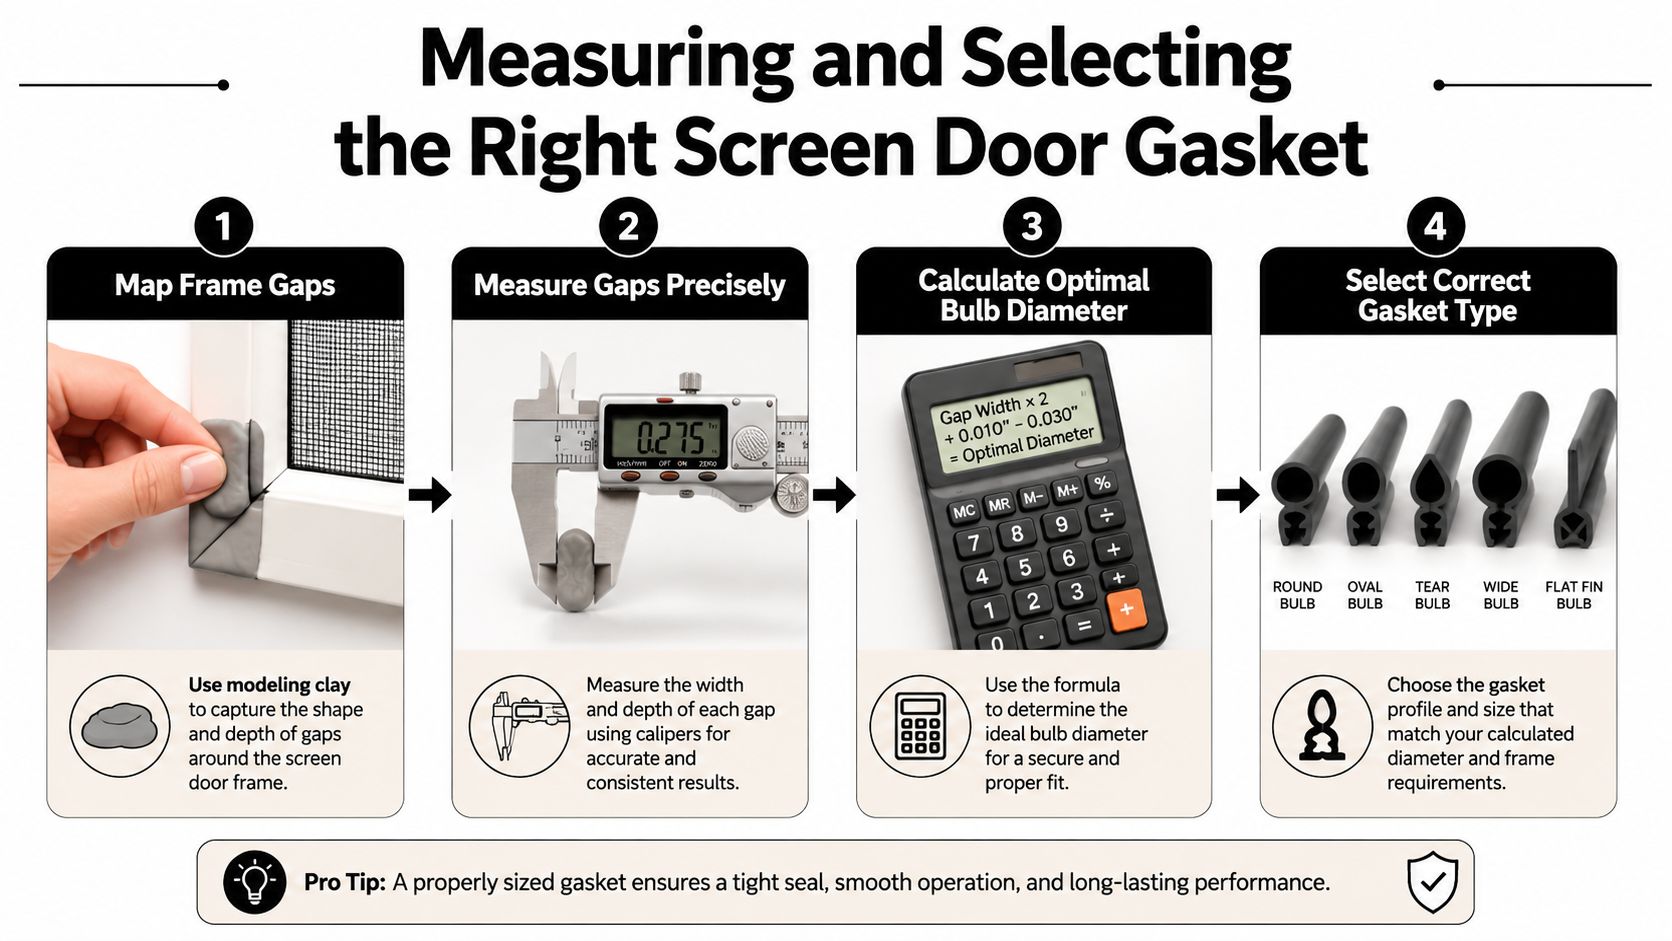
The most reliable method uses modeling clay and calipers. The clay shows the precise space the gasket needs to fill. The calipers let you read that space accurately.
Use this process:
- Place small bits of modeling clay at several points around the frame, especially corners and the latch side.
- Close the door carefully so the clay compresses to the true gap.
- Open the door and remove the clay.
- Measure the compressed clay with calipers.
- Record several readings instead of relying on one spot.
That gives you an average gap and also shows whether one area is much tighter or looser than the rest.
Apply the compression rule
According to this door seal design guide, screen door gaskets rely on 25% to 50% compression to achieve optimal sealing without causing permanent deformation. The same guide explains the sizing approach as:
Average Gap Size + Compression Percentage = Bulb Size
In plain language, the gasket should be slightly larger than the gap so it compresses into a seal when the door closes.
A simple way to choose
When you're comparing options, work through this checklist:
- Start with gap consistency: If measurements vary a lot, a bulb profile usually handles inconsistency better than a flat strip.
- Match the climate: For heavy sun exposure, lean toward materials known for better UV and heat resistance.
- Check mounting style: Some gaskets press into a channel. Others use adhesive backing. Buy the profile that matches your frame.
- Think about door movement: A sliding door needs a seal that won't create too much drag against the frame or interfere with smooth travel.
Don't skip seasonal judgment
A door measured in a cooler month may fit differently in peak summer heat. That doesn't mean you should oversize the gasket aggressively. It means you should pay attention to how tight the frame already feels and avoid a profile that will over-compress during hot weather.
If you're between sizes, it's usually safer to choose the option that seals without forcing the door closed.
Identifying Common Gasket Failures
A failed gasket doesn't always look dramatic. Sometimes it falls apart in plain sight. Other times it breaks down, one corner at a time.
In high-UV climates like Phoenix, perimeter gaskets often need replacement every 1 to 2 years, compared to generic intervals of 2 to 3 years cited for standard weatherstripping, as noted in this gasket replacement guidance for high-UV conditions. That's one reason homeowners in desert climates often deal with “bug leaks” sooner than expected.
Five failure patterns to look for
Not every problem means full replacement today, but each one deserves attention.
Shrinkage
The gasket pulls back from a corner or leaves a short section uncovered. This often happens after prolonged heat exposure. The result is a small but direct pathway for insects.Cracks and surface splitting
The outer skin dries out and starts breaking open. Once the surface cracks, the seal loses flexibility and won't conform to the frame as well.Compression set
The gasket stays flattened after the door opens. Instead of springing back, it remains squashed. That usually means the seal has spent too long under too much pressure, or the material has aged out.Missing sections
A portion tears off, peels away, or comes loose at the end. This creates an obvious opening, but homeowners sometimes miss it when the gap hides on the hinge side or near the upper frame.Material breakdown
Foam crumbles, rubber hardens, adhesive fails, or the profile loses shape. In desert conditions, this often shows up as a seal that looks dusty, brittle, or uneven.
The hidden problem of ghost gaps
Some gaps only appear when the door is fully latched. Others appear only midway up the frame where the door bows slightly. These are the “ghost gaps” that frustrate people because the door seems closed and the mesh looks fine.
Use these quick checks:
- Flashlight test: Shine light from outside at night and look for edge glow indoors.
- Paper test: Close the door on a thin slip of paper at several points. If it slides out too easily in one area, contact may be weak there.
- Visual line check: Look down the edge of the closed door for places where the gasket isn't touching evenly.
- Dust clue: Fine dust collecting along one edge often points to a failed seal.
If bugs keep getting in and the mesh is intact, inspect the perimeter before you re-screen the whole door.
When repair works and when it doesn't
A small loose end or detached section may be repairable if the rest of the gasket is still soft and resilient. A hardened, shrunken, or permanently flattened seal usually isn't worth patching. Spot repairs on old material often create uneven pressure and leave you with the same problem in a different corner a week later.
In Phoenix-area conditions, repeated patching can turn into a cycle. Replacing the perimeter seal with a better-matched material often solves the root issue more cleanly.
High Level DIY Screen Door Gasket Replacement Process
Replacing a screen door gasket is usually manageable for a careful homeowner. The key is to treat it like a fit-and-prep job, not just a peel-and-stick task. Most installation problems start before the new gasket ever touches the frame.
For context on timing, exterior screen door gaskets typically require replacement every 5 to 8 years due to UV radiation and mechanical wear, though high-UV regions may need more frequent swaps, according to InterNACHI's estimated life expectancy chart.
The basic replacement sequence
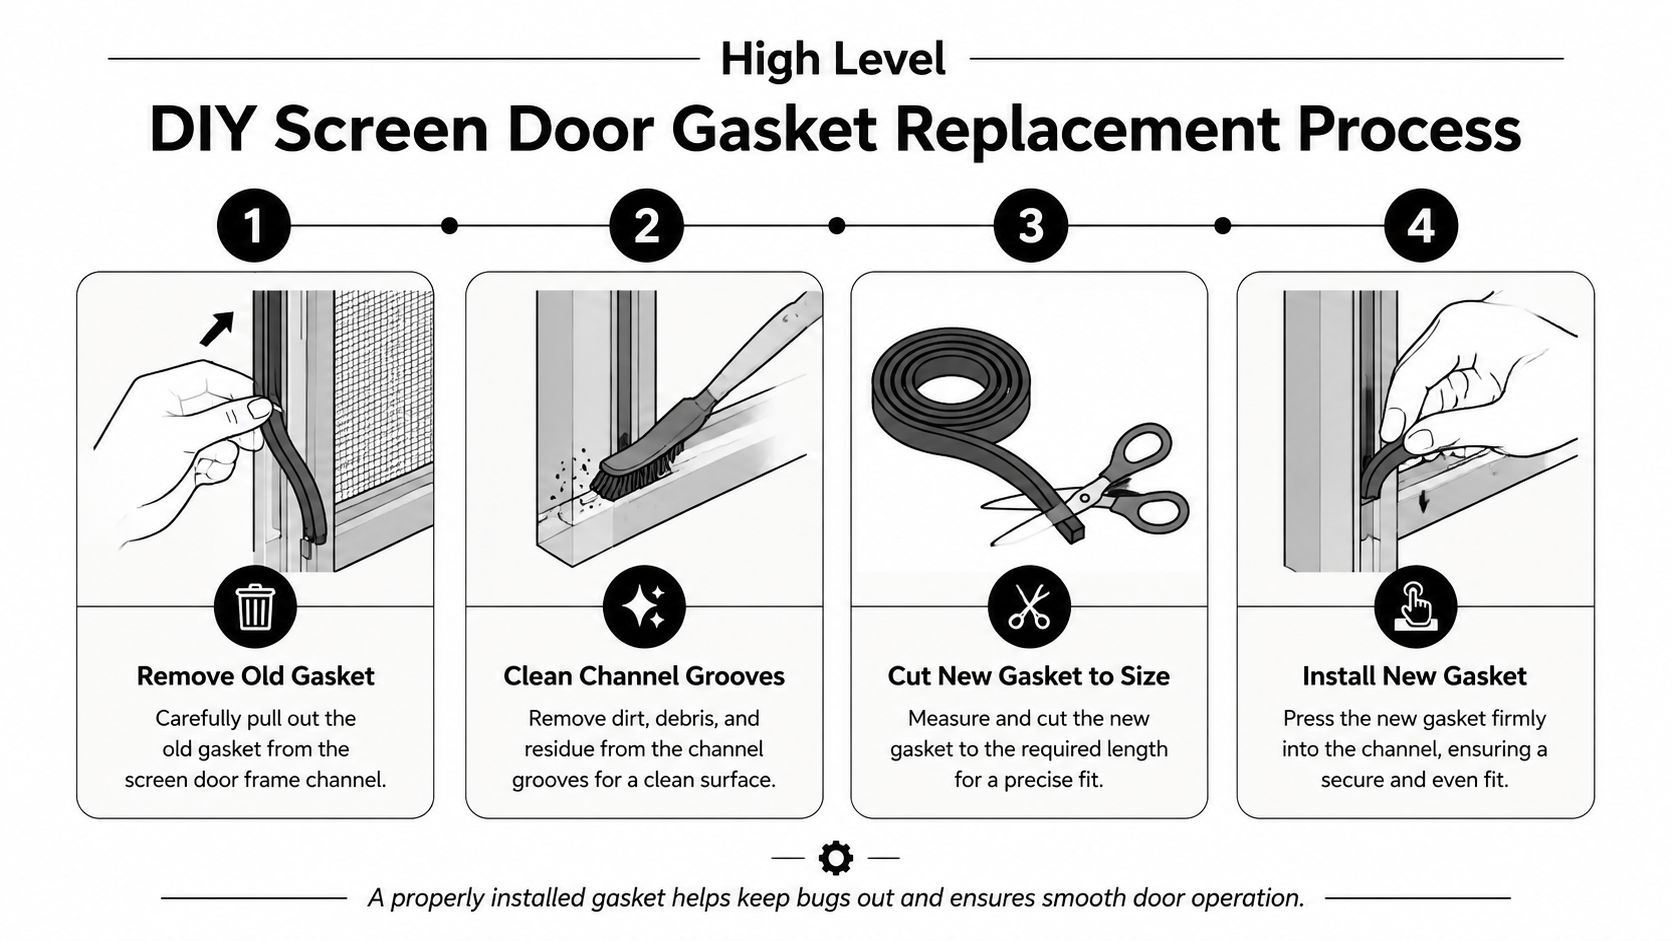
Most jobs follow the same high-level path:
Remove the old gasket
Pull out the worn seal gently. If it sits in a channel, avoid bending the frame lip. If it uses adhesive backing, peel slowly so you don't leave heavy residue behind.Clean the contact area
Dirt, old adhesive, and oxidized residue prevent a new seal from sitting flat. Use a non-damaging cleaner suited to the frame material and wipe the area dry before installing anything new.Cut the new gasket to length
Measure each side carefully. Don't assume both vertical sides are identical if the frame has settled. Cut clean ends so corners meet neatly.Install the new seal
Press it into the channel or apply the adhesive-backed profile evenly. Work gradually instead of stretching the material tight. Stretching often leads to later shrink-back at the corners.Test door movement and seal contact
Open and close the door several times. Check for drag, bunching, missed contact points, and latch alignment.
A video example helps
Seeing the sequence makes the process less abstract for first-timers.
Tools and safety notes
You usually won't need a huge toolkit. Common items include a utility knife or scissors, cleaning cloths, a scraper safe for the frame, calipers if you're still verifying fit, and possibly adhesive suited to outdoor heat if your system requires it.
A few precautions matter:
- Support the door if needed: If you remove a sliding panel or loosen hardware, make sure the door is stable.
- Don't rush adhesive work: Hot weather can change how quickly adhesive grabs.
- Avoid over-stuffing channels: Forcing in the wrong profile can damage the frame or distort the seal.
- Check the track too: If a sliding door still binds after gasket replacement, the issue may include rollers or debris. If that sounds familiar, this guide to screen door track repair can help you separate gasket problems from track issues.
What success looks like
A good replacement doesn't just “stay on.” The door should close normally, the gasket should make even contact, and the corners should stay covered after repeated use.
Install the gasket to the frame's shape, not to the package length. A stretched seal almost always comes back to bother you.
If the door now needs excessive force to latch, the profile is probably too large or too stiff for the available gap. If the seal looks neat but you still have edge light, the profile may be too small or the frame may be out of alignment.
Choosing DIY or Professional Service
DIY makes sense when the frame is in good condition, the gasket profile is easy to identify, and you're comfortable measuring carefully. It's also a good fit when the problem is isolated to worn weatherstripping and the door otherwise moves, latches, and aligns the way it should.
Professional service becomes the better choice when the job isn't really “just a gasket” anymore. A warped frame, unusual profile, dragging slider, damaged track, or persistent corner gaps can turn a simple seal swap into a troubleshooting project. Professionals also help when you want the fit judged on-site instead of ordering parts by trial and error.
For Phoenix-area homeowners, that local judgment matters. High UV exposure changes how quickly seals fail, and the right replacement material for one patio door may not be the best match for another that gets harsher afternoon sun.
If your screen door still lets in bugs, dust, or hot air around the edges, Northwind Screen Co. can help with quick quotes, same week service, and same day pickup options for many Phoenix-area homeowners. Whether you need a fresh perimeter gasket, rescreening, slider repair, or a full screen tune-up, their team handles bug screens, sun screens, screened patio rescreening, and related screen door repairs across the Valley.
Thinking about a porch or patio rescreen?
Get a quick quote on custom screens, sun and solar screens, slider repairs, and patio rescreening. Same-week service and a lifetime guarantee.